Thursday, August 26, 2010

555-STUD!!!

We just got the best invitation for a 50th Birthday Party the other day in the mail and the RSVP number was 555-STUD! It reminded me of a project I have wanted to do after I tried to help a friend hang a picture. Everything was gong well until we realized we had the wrong mounting kit. Oh well! We would have to go back to the drawing board and get the correct supplies the next day. Whenever I have to do a project that involves The Home Depot I always allow for a least three trips to the store for returns and exchanges. :) Anyway, we decided that we would still get some of the pre-work done and that involved finding the studs. We laughed so hard that night and we both ending up on the floor! “Let’s just put post-its” turned into, actually writing out S.T.U.D. on the post-it, which in turn turned into finding the studs on the other wall so we could then spell out M.U.F.F.I.N.! And then we thought…let this be the art! And so here it is…in all it’s glory! Post-it Note Wall Art! Eventually, I am going to quilt up some panels and do this the right way, but for now this will do!


An Oldie, but a Goodie!

This piece was completed during a summer class taught by the amazing Art Sherwyn (I learned how to block print from his daughter, Liz Sherwyn). The original idea was to create people on each side and they would be sectioned accordingly, so when a box was turned the proportions would still match up. This would have been an “epic” fail if I tried to draw and paint people, so I went with nature. Nature, specifically florals, never lets me down, so I opted for that route. I got a little crazy with the mediums I used: tiles, paint, graphic stickers, and pressed flowers. I do admit that I’m really happy with the way it came out! I love the colors and texture. There is even a place to put flowers!!! There was a really talented lady who also took the class and she painted hers beautifully. She didn’t follow the original guidelines either and for each side she painted a close up feature of the face: lips, eyes, etc. It turned out so good!


Wednesday, August 25, 2010

Pretty Pillows!

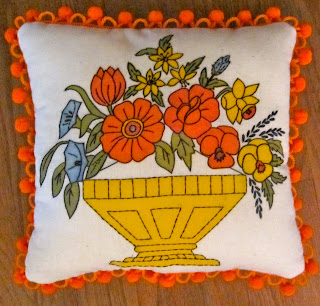
Pillows are fun and functional and they are super simple to make! Basically, you put right sides together and sew around. Be sure to leave an opening for turning and stuffing. Then, close up the hole after you fill it (with your fabric scraps of course; no sense in spending money on stuffing when you have perfectly good scraps around)! :) Pillows are also great because you can make them more elaborate if you wish and you can change your room aesthetic in a snap just by adding a new throw! The orange floral just so happens to be our first pillow collaboration!!! The very talented Johnny Ramos painted the floral motif and let us transform it into a pillow! It is not quite finished yet because I want to get him to sign it but, I just love it! He paints the most beautiful and graphic pieces and I would love to make more pillows from his paintings in the future. I can just imagine seeing a room with his paintings hanging and the pillows accenting the furniture! Interior decorating photos soon to come?!? :) The other orange pillow is made from a scrap piece of embroidered fabric. We found this find at a quilt show and I think it was only a quarter! What a gem! I didn’t know what to make with it for the longest time, but I think a pillow is a perfect fit. The green pillow is the smallest of the bunch, but it took the longest to make. The technique used is called needle punching. It’s simple really: you take a needle tool...you thread it....you poke over and over and over! If you’re stressed then this is a must have! I have created many needle punch projects in my times of distress! With that said, ”Keep calm and”...make a pillow!


Tuesday, August 24, 2010

I HE(art)!

I love art and it feels so good to be back in the studio doing what I love! Thank you so much Dan for the throwing lesson refresher! And thank you Horse for helping me free up! Hopefully these little guys will turn out!


Sunday, August 22, 2010

“The end...question mark?”

Nope! It’s not the end. In fact...it’s just the beginning! Well, it’s actually more like the middle, but the point is that YOU still have two more weekends to see The Killing Ghost at The Empty Space (August 27th and 28th at 8 pm and September 3rd and 4th at 8 pm)! This show has a special place in my heart because this is the most involved I have been in a show...ever! I have had the best experience and this opportunity couldn’t have come at a better time and I am so thankful for the wonderful people involved. I love the cast! They are talented and so much fun to work with! I crack up every night and it never gets old! Getting to see how the whole process works has been so eye opening and I have so much respect for everyone involved in this show and in others. It takes a lot of time and dedication and I wish more people would come out and support their efforts. One of the coolest aspects is that this play was written and edited by actors in the show! Another amazing thing is that many of the people involved with this show have other commitments as well...jobs, other plays, and other written projects that they are working on. It is so refreshing to be in a room surrounded by so many creative people! The energy is truly contagious. I love hearing their ideas and getting caught-up in all their excitement! It is so much fun to be a part of and you can be a part of it too!


Wednesday, August 4, 2010

Upcycled...

Trash to Treasure...New to You...A Fresh Start! Lately we have been...well, BUSY first of all, but also really consumed with cleaning and using what we have! It's sometimes hard to let things go, but when they go to the right people it's perfect! And the perfect place for our furniture to be donated to is Chic Staging & Design! So, if you have any old furniture that you need taken off your hands contact CS&D and they will give your treasured pieces new life and you will also be supporting their business! I always love supporting friends and other artists!!! It's a win-win! I can't wait to see what they do with our bookshelves and where they end up!


Monday, July 5, 2010

This should be relaxing…

Famous last words! Learning how to crochet made me a bit tense, but I pushed through the urge to quit and now I own the Granny Square…what about that!?! Having a patient teacher also helps, as does holding the yarn the correct way. You need just the right amount of tension and I don’t mean the stressful kind. Along the way, directions were written down so take a peak. Once you get the basic patterns it’s really a breeze, so keep at it! Check out videos online or have someone show you like I did. If you are interested in learning or have a question about the directions email me and I’ll help you as best I can to pay it forward! I don’t have any pictures yet, but I’ll get some up here in about 6 years…I’m working on a blanket! :)


Crocheted Granny Square

FIRST ROW:

Chain 5
Make a circle by slipstitching into he first chain

First Shell:
Chain 3 (to make first 1/3 of shell)
Double crochet into the hole (center of circle)
Double crochet again

Chain 3 (to make corner)
Double crochet 3 times = Shell

Chain 3
Double crochet 3 = Shell
Chain 3

End Round:
Join with slip stitch in top of first shell
Slip stitch in top of shell twice to get to corner
Slip stitch in corner hole


NEXT ROW

First Shell:
Chain 3
Double crochet twice

Chain 3 for corner
Shell (3 double crochet) in same hole
Chain 1

In Same Hole (Corner Shells):
Shell
Chain 3
Shell

Chain 1
Corner Shells
Chain 1
End round (go back to end round directions)

*As your piece gets larger, so will the number of shells that are in between the corner shells.

*Use scraps of yarn when you are first creating the piece and increase to full skeins as it grows.
*When you switch colors, start back on the next corner over.